CNN 기반 텍스트 분류
이전에는 이미지의 처리에서 사용되었던 CNN(Convolutional Neural Network)를 자연어처리 과업에도 가져와 사용해본다.
자연어처리 문제에서도 CNN이 사용가능한 이유는 공간의 정보를 보존하는 CNN의 장점때문인데, 자연어의 문장에서도 지역적인 정보가 텍스트안에 내재되어 있으므로 좋은 성능을 보인다.
하지만 이미지를 처리하는 과정과는 조금 다르다.
이미지에 대해서 convolutional 계산을 적용할 때는 가중치를 가진 sliding window가 왼쪽 위부터 오른쪽 아래까지 모두 훑으면서 연산을 진행한다.
하지만 텍스트가 input일 때는 임베딩 벡터 크기는 유지를 해주면서 convolutional 연산이 진행된다.
또한 N-gram처럼 문장에서 몇개의 인접한 단어들로 지역적인 정보들을 뽑아낼 것인지 정해야한다.
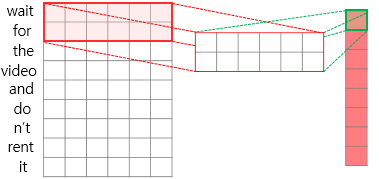
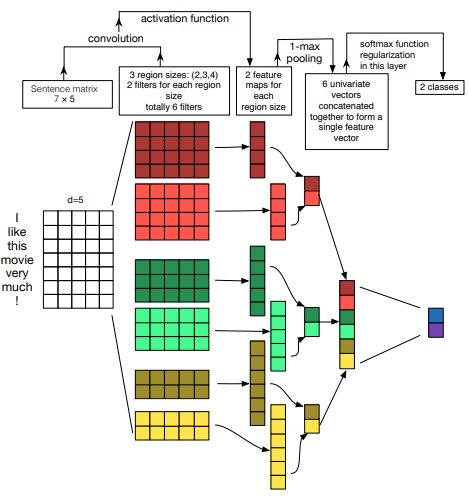
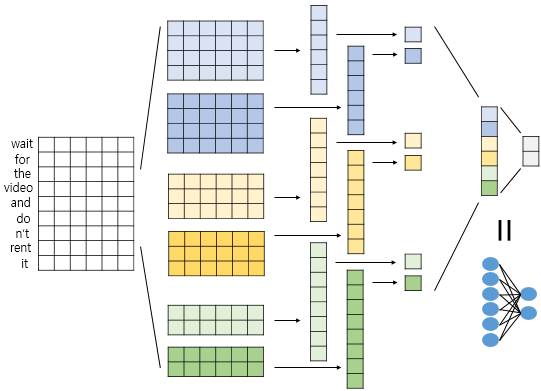
예를 들어 위의 그림처럼 어떤 문장이 들어오면 세로로 문장에 포함되어있는 단어들이 나열되고 각 단어들은 embedding vector를 가진다. 이 때 convolutional 연산을 위해 parameter(가중치)는 그림처럼 2~5개의 단어를 포함하면서 column의 개수는 embedding크기와 동일하게 설정된다. 결과적으로 연산을 통해 (문장 내 단어의 개수 x 1) 크기의 Tensor가 나오게 된다.
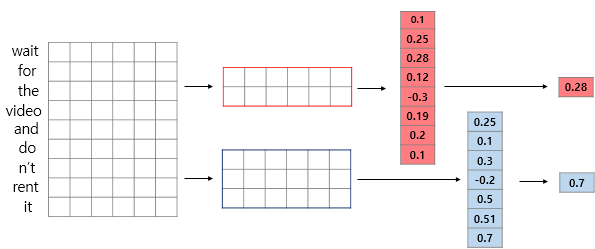
이후에는 이미지처리에서의 CNN 구조와 별반 다른 것이 없으나 Max pooling 층이 있다면 이는 단어에 대한 정보를 가지고 있는 vector 전체에 대해서 처리되어야 한다. (다만 Batch size에 해당하는 부분은 포함하지 않고 각각 batch마다 실행되는 것임. 아래의 그림 참고)
마지막으로 pooling과 여러 다른 기법들(dropout, fc층)에 의해 결과가 도출되었다면 softmax에 의한 확률값으로 class를 분류하게 된다.
Pytorch class 및 함수들
이번 학습에서는 pytorch를 사용하여 텍스트 분류를 위한 텍스트 전처리, 신경망 구조 설계를 했다. pytorch를 사용한 자연어처리는 생소하기 때문에 기억하고자 기록한다.
아래는 텍스트 분류를 위한 전처리 예시 코드이다.
class mydataset(data.Dataset):
    @staticmethod
    def sort_key(ex):
        return len(ex.text)
    def __init__(self, text_field, label_field, path=None, examples=None, **kwargs):
        fields = [('text', text_field), ('label', label_field)] # text_field는 text로 호칭하고, label_field 필드는 label로 호칭
        if examples is None:
            path = self.dirname if path is None else path
            examples = []
            for i,line in enumerate(open(path,'r',encoding='utf-8')):
                if i==0:
                    continue
                line = line.strip().split('\t')
                txt = line[1].split(' ')

                examples += [ data.Example.fromlist( [ txt, line[2]],fields ) ]
                # data.Example을 사용하면 example로 들어오는 input의 column들을 저장한다.
        super(mydataset, self).__init__(examples, fields, **kwargs)


text_field = data.Field(batch_first=True, fix_length=20)
label_field = data.Field(sequential=False, batch_first=True, unk_token=None)

train_data = mydataset(text_field, label_field, path='/content/gdrive/My Drive/Colab Notebooks/aivle/data/nsm/small_ratings_train_tok.txt')
test_data = mydataset(text_field, label_field, path='/content/gdrive/My Drive/Colab Notebooks/aivle/data/nsm/small_ratings_test_tok.txt')

text_field.build_vocab(train_data)
label_field.build_vocab(test_data)

train_iter, test_iter = data.Iterator.splits((train_data, test_data), batch_sizes=(100, 1))

print(len(text_field.vocab), len(label_field.vocab))- data.Example
- data의 Example은 input으로 들어오는 데이터의 column을 저장한다.
- data.Dataset(class mydataset에서 __init__함수의 super(mydataset, self).__init__(examples, fields, **kwargs) 과 동일한 과정)
- data.Dataset은 example과 field를 인자로 받아 example에 대해서 field 정보를 가지고 dataset을 만든다.
- example은 column과 text, label정보가 들어있고 field에는 text, label이라는 정보가 들어있어 field를 참고하여 example에서 text와 label을 뽑아내어 dataset을 구성한다.
- 만약 example에 id, dummy와 같은 다른 column이 존재한다면 data.Dataset은 field를 참고하여 필요없는 column은 버리고 field에 작성되어 있는 column만을 추출하여 dataset으로 만든다.
- data.Field
- 먼저 기본적으로 우리에게 주어지는 텍스트 데이터는 정형 데이터고 순서는 id, text, label라고 가정한다.
- data.Field는 이런 데이터를 text(x), label(y)로 나누어주며 텍스트를 토큰화(indicing화)해준다.
- batch_first는 batch size에 해당하는 rank가 가장 앞으로 오게 할 것인지에 대한 여부 (default: False)
- sequential은 연속된 데이터인지 여부이다. text는 True로 해야 텍스트→토큰화된다. 당연히 label은 False로 해야한다.(이미 수치화(1,0)이기 때문) (default: True)
- use_vocab : Vocab 개체 사용 여부. False인 경우 이 필드의 데이터는 이미 숫자여야 함. (default: True)
- tokenize : 사용될 토큰화 함수 (default: string.split)
- lower : 영어 데이터 소문자화 (default: False)
- is_target : target variable 여부 (default: False)
- fix_length : 최대 허용 길이. 이 길이에 맞춰 패딩(Padding) 작업 진행
- unk_token: unknown token에 대해서 정보를 줄 수 있다. (default: 'unk')
- field.build_vocab
- 정의한 필드에 단어 집합을 생성한다.
- data.Iterator
- torchtext의 데이터로더를 만드는 방식이다.
- .splits를 사용해 train과 test 데이터로 분할할 수 있다.
CNN 신경망 구조 설계
# CNN 모델의 구조와 연산을 정의
class CNN_Text(nn.Module):
    # 생성자 : 모델의 구조와 동작을 정의
    # 객체가 갖는 속성값을 초기화함. 객체가 생성될 때 자동으로 호출된다.
    def __init__(self, embed_num, class_num):
        super(CNN_Text, self).__init__() # nn.Module 클래스를 초기화
        # V: 사전의 크기
        # D: embed_dim
        # C: 분류하고자 하는 클래스의 개수
        # Co : 각 커널(필터)의 갯수
        V = embed_num
        D = 100  # dimension
        C = class_num
        Co = 50         # output channel 수 (필터의 갯수)
        Ks = [2,3,4]

        # 사전에 있는 모든 단어 벡터에 random 초기값
        self.embed = nn.Embedding(V, D)
        # torch.nn.Conv2d (in_channels, out_channels, kernel_size, stride=1)
        # convs1에 컨볼루션 모듈의 리스트가 들어감 (필터(커널) 갯수만큼)
        # forward에서 순차적으로 접근 가능
        self.convs1 = nn.ModuleList([nn.Conv2d(1, Co, (K, 100)) for K in Ks])
        self.dropout = nn.Dropout(0.2)

        # nn.Linear 클래스. Fully Connected Layer
        # Applies a linear transformation to the incoming data (y = Wx + b)
        # torch.nn.Linear(in_features, out_features)
        # in_features: size of each input sample, out_features: size of each output sample
        self.fc1 = nn.Linear(len(Ks)*Co, C)

        # foward 함수 : 모델이 학습데이터를 입력받아서 forward 연산을 진행
        # model 객체를 데이터와 함께 호출하면 자동으로 실행된다.
    def forward(self, x):
        x = self.embed(x)   # (N, W, D) 미니배치, 문장 최대길이, 단어벡터 차원
        x = x.unsqueeze(1)  # (N x Ci x W x D) Conv2d를 사용하려면 입력채널 수 추가해야 함 -> conv2D를 사용하기 위함

        # Convolution Layer
        # Convolution -> ReLU -> 텐서의 dimension 3을 squeeze(max_pool1d는 3D 입력을 받음)
        x = [F.relu(conv(x)).squeeze(3) for conv in self.convs1]

        # Max Pooling
        # F.max_pool1d(input, kernel_size): Applies a 1D max pooling over an input
        # Tensor.size(dim=None) : Returns the size of the self tensor. If dim is specified, returns the size of that dimension.
        x = [F.max_pool1d(i, i.size(2)).squeeze(2) for i in x]  # [(N, Co), ...]*len(Ks) max pooling 후에 마지막 차원은 1 -> squeeze
        x = torch.cat(x, 1) # torch.cat(tensors, dim), dim=1이면 두번째 차원이 늘어나게 concat (첫번째 차원은 N)
        x = self.dropout(x) # (N, len(Ks)*Co), dropout을 적용
        logit = self.fc1(x) # fully-connected layer 적용
        return logit


cnn = CNN_Text(len(text_field.vocab),2)

# torch.optim : 신경망 학습을 위한 다양한 파라미터 최적화 알고리즘이 구현되어 있는 팩키지
# Optimizer를 설정
optimizer = torch.optim.Adam(cnn.parameters())
cnn.train() # 학습 시작은 X, train mode로 변경!


for epoch in range(20):

    totalloss = 0
    for batch in train_iter:
        optimizer.zero_grad() # resets the gradient to 0

        txt = batch.text
        label = batch.label

        #print(txt.size()) -> torch.Size([100, 20])
        pred = cnn(txt)

        #print(pred.size(), label.size()) -> torch.Size([100, 2]) torch.Size([100])
        #print(label)
        loss = F.cross_entropy(pred, label)
        totalloss += loss.data

        loss.backward() # backward 연산
        optimizer.step() # 파라미터 업데이트

    print(epoch,'epoch')
    print('loss : {:.3f}'.format(totalloss.numpy()))
torchtext Reference
03. 토치텍스트 튜토리얼(Torchtext tutorial) - 한국어
이번 챕터는 바로 앞 챕터인 토치텍스트 영어 데이터 챕터를 이미 진행했다고 가정하고 진행됩니다. ##**1. 형태소 분석기 Mecab 설치** ``` # Colab에 Me ...
wikidocs.net
https://dacon.io/codeshare/1923
Pytorch Starter
AI야 , 진짜 뉴스를 찾아줘! AI 경진대회
dacon.io
https://torchtext.readthedocs.io/en/latest/data.html#fields
torchtext.data — torchtext 0.4.0 documentation
torchtext.data The data module provides the following: Ability to define a preprocessing pipeline Batching, padding, and numericalizing (including building a vocabulary object) Wrapper for dataset splits (train, validation, test) Loader a custom NLP datase
torchtext.readthedocs.io
https://pytorch.org/text/_modules/torchtext/data/dataset.html
torchtext.data.dataset — torchtext 0.8.0 documentation
Shortcuts
pytorch.org
https://velog.io/@danbibibi/PyTorch-torchtext.legacy.data.Field
PyTorch: torchtext.legacy.data.Field
torchtext.legacy.data에는 필드(Field)라는 도구를 제공한다. 필드를 통해 앞으로 어떤 전처리를 할지 정의할 수 있다.
velog.io
python 정보 Reference
아래의 time command를 cell에 사용하면 전체 cell이 실행이 완료되었을 때 소요된 시간을 알 수 있다.
%%timehttps://sosomemo.tistory.com/60
Jupyter Notebook 자주 사용하는 매직 커맨드 (%커맨드)
Jupyter Notebook 자주 사용하는 Magic Command 정리 Ipython (Jupyter Notebook) 에는 마법같은 기능을 제공해주는 Magic Command 가 내장되어 있습니다. 당장 Cell 에 %lsmagic 이라고 입력하면 다음과 같은 다..
sosomemo.tistory.com
아래는 상속 관련 글
https://supermemi.tistory.com/178
[ Python 3 ] 클래스의 super( ) 에 대해 제대로 알아보자! ( super().__init__(), super()의 위치)
[ Python 3 ] 클래스의 Super( ) 에 대해 제대로 알아보자! ( super().__init__(), super()의 위치) [ 이전 글 ] 클래스(Class)를 제대로 알아보자! (인스턴스 속성, 클래스 속성, 메소드) [ Python..
supermemi.tistory.com
https://supermemi.tistory.com/179
[ Python 3 ] super(클래스, self).__init__() 에 대해 제대로 알아보자!!
[ Python 3 ] super(클래스, self).__init__() 에 대해 제대로 알아보자!! [ 이전 글 ] 클래스(Class)를 제대로 알아보자! (인스턴스 속성, 클래스 속성, 메소드) [ Python 3 ] 파이썬의 클래스(Class)를 제대..
supermemi.tistory.com
'ML & DL > NLP' 카테고리의 다른 글
| NLP(자연어 처리) 입문 7 - Seq2Seq, Attention (0) | 2022.10.08 |
|---|---|
| NLP(자연어 처리) 입문 6 - RNN, LSTM (0) | 2022.10.07 |
| NLP(자연어 처리) 입문 4 - 텍스트 마이닝 (word2vec) (1) | 2022.10.04 |
| NLP(자연어 처리) 입문 3 - 기계학습 (1) | 2022.10.03 |
| NLP(자연어 처리) 입문 2 - 패턴 매칭 (0) | 2022.10.02 |